Wednesday, December 19, 2012

HOLIDAY TOP THREE

The Christmas season is already upon us, but I want to share my top three ingredients for a holiday gathering or a Christmas dinner!

1. PEPPERMINT: a classic flavour that always makes me think of Christmas. Whether its a peppermint hot chocolate or an actual candy cane, I just can't get enough of this flavour during the holidays. This year try making a chocolate cake (or chocolate cupcake) with a peppermint buttercream frosting. Finished with a little crushed candy cane and you have an incredibly festive dessert that will make any dessert table proud.


2. ORANGE: a great citrus fruit that can be transformed into many holiday treats. Orange is a versatile flavour that you can take the sweet or savour route. Not only is it a delicious flavour, but also a beautiful fruit. Keep the rind in tact when using an orange, it helps to enhance the flavour and the appearance! Try making an orange marmalade, great on toast or scones on Christmas morning. Combine with flavours like cloves and cinnamon to make a warm mulled wine.


3. SAGE: an earthy herb that is great both fresh and dried. Sage is the quintessential turkey stuffing flavour, this year try cooking it out a bit with your butter when making your stuffing. This will release all of the oils from the leaves, letting out that strong sage flavour!


photo credit: google images

Tuesday, December 11, 2012

CHALKBOARD CHARGERS

I love nothing more than a festive & inviting table. Whether it be a Christmas table, a holiday gathering, or a table featuring all types of treats at a party - I can't help but love each little piece that makes that table perfect to look at.

I have a serious hobby of collecting items to make a table look fabulous - chargers, table cloth, candles, decorative pieces, the list goes on!

I discovered this great DIY chalkboard chargers, and I am now on a mission to do these for my Christmas dinner table. Simple to make, these chargers will bring life and winter fun to your table!


(via delight by design)

Monday, December 10, 2012

CRANBERRY CHRISTMAS


A CRANBERRY CHRISTMAS... Last week I did a photo shoot with a great fellow blogger named Sara Russell. She wanted a foodie inspired post, something festive. I had just finished a batch of cranberry ginger jam and thought that picking the cranberry would be a perfect way to highlight a great and versatile seasonal ingredient.
Three ways to highlight a totally seasonal ingredient. Tart, but beautiful when sweetened, cranberries can be shown off in so many ways during the holiday season. Here are three quick ways to please your family and friends.

1) BAR STYLE: champagne & cranberries. In the bottom of your glass place a few fresh cranberries, fill with champagne, ginger ale or sparkling water and serve at any holiday gathering.


2) PRESENTS: give the gift that says you care the most – something homemade! This cranberry jam is quick and amazing. The addition of ginger elevates the jam from your boring old cranberry sauce. (In a sauce pan, mix together equal weight cranberries & sugar. Grate in a knob of ginger and cook for about 45 minutes – 1 hour or until jam consistency is achieved)


3) ENTERTAINING: serve this quick cranberry brie bites at a cocktail party or a holiday dinner. Super easy, you will spend 20 minutes max from start to finish! In a mini muffin pan, place a buttered square of phyllo pastry. Fill with 1-2 cranberries and 1-2 cubes of good quality brie cheese. Bake on 350 for 8-10 minutes or until the phyllo is golden brown and the brie has melted and is oozing. Serve warm and drizzle with a little olive oil and a sprinkle of pepper. Festive & delicious, these treats will not disappoint!

photo credit: sara russell

Tuesday, December 4, 2012

CELERIAC & POTATO MASH

Finally December is here, marking the start of the Christmas season and many wonderful goodies to come!

To start off the December posting, I thought I would share a recipe for a celeriac and potato mash, something to think about as a twist on your mashed potatoes this Christmas season.


Celeriac is a totally underrated root veg that is widely available! It has a fabulously sweet and earthy flavour, but most people don't know what to do with it! It is a great option in lieu of sweet potatoes, turnips etc. It can be mashed, roasted or thinly shaved to be part of a festive root vegetable salad. I hope you enjoy this twist on the boring old mashed potato and give it a whirl - even if it's not for Christmas dinner, impress some family or friends with this dish this holiday season!


Note: This dish is also beautiful under a braised short rib, braised lamb shank or some lovely beef filets, flank steak or roast beef!


Celeriac & Potato Mash

Ingredients:
1 whole celeriac
About 800g of potato (roughly the same amount as the celeriac)
Splash or two of cream or milk
2 tbsp butter
Salt and pepper

Directions:
1. Peel the celeriac by slicing off the rough skin - do not use a peeler, you will need a knife! Then cube into pieces.
2. With the equal amount of potatoes, wash and peel and cube into the same size as the celeriac.
3. Boil in salted water, and allow to cook for about 20 minutes.
4. Drain the veg, return to the pot add the cream, butter, salt and pepper and mash. Season to your taste and serve!


photo credit: google images

Wednesday, November 28, 2012

HOLIDAY GIFTS

Today I stumbled across a really great new website (LEIF) - which definitely brought out my Christmas spirit. I love finding new kitchen-y things for Christmas to help brighten up the holiday and also to change it up from my boring old year long utensils.

This website has some really great kitchen utensils (all under $25) which would be a perfect host/hostess gift, a gift to a foodie friend, or a gift to yourself!


Blinged out tart server


Blinged out spoons - really fun for a Christmas coffee morning


Tree branch teaspoons

Tree branch mini knives - these would be great on a cheese board, or as a hostess gift with some cocktail napkins!


Tuesday, November 27, 2012

CHEESE OF THE WEEK

Last week for a client, one of their courses was a cheese platter. I felt this was a great opportunity to try out some new cheese. I went down to the St Lawrence Market - to one of my favourite cheese shop Olympic Cheese Mart. I asked the owner George for some good recommendations of a few new delicious cheeses to taste. Here were my top three picks:

1. Pecorino Affinato: Is a small cheese made from sheep's milk with a white and crumbly texture. This was one of my favourite cheeses to snack on when I worked at BUCA. I loved having this one on the cheese board. The cheese is aged for 2-3 months in terracotta jars under layers of scented hay and honey. The two flavours lend a unique flavour to the cheese - and also is visually stunning on a cheese platter.


2. New Glarus Raspberry Ale Washed: This one of Glarus the best cheeses I have tried in a while. Made in Wisconsin, the cheese is soaked in Wisconsin-brewed New Raspberry Tart Ale, a fruit, pungent ale that is brewed with fresh raspberries which lends a slight sweetness to the final product. A combination of aged cheddar & parmesan - a perfect combination of crumbly but smooth. The flavours are strong and complex. The first bite the cheddar hits you, but then the saltiness and nuttiness of the parmesan cuts through that. Perfect to enjoy with onion jam, roasted hazelnuts and a nice glass of Guinness stout or a dry Riesling. This cheese won "Best New Cheese" & "Best AMerican Cheese" during the 2008 World Cheese Awards in Ireland.


3. Applewood Smoked Cheddar: This is a cheddar that is naturally smoked with applewood embers and then finished with a light dusting of paprika - hence the reddy orange outer layer to the cheese. The cheese is a semi-hard cheese that has a wonderful smoky flavour due to the natural smoking. This is a favourite in the UK and goes extremely well with sweeter apples, raisins and also a pork chop. This smoked cheddar also could lend a really nice smoky flavour to a homemade quesadilla!


Tuesday, November 20, 2012

BBQ SMOKING

BBQ and true southern smoked meat is a  love of mine. I think it all started watching so many Diner, Drive-Ins and Dives episodes, but further heightened the more I tried different barbecue restaurants and the more I practiced. A new part of barbecue that I have recently started to learn more about it smoking!

I just moved into a new place that has a large backyard and patio - so one of the first things on my list to get is a smoker. I can't wait to start testing out different types of wood and styles. Watch out Toronto, there is going to be a new BBQ master in town!


I found this great list of wood tips, tastes and ideas online, and have used it for my own cooking, so I thought I would share these great tips with you. You don't need a smoker to enjoy that smokey flavour, there are plenty of ways to DIY smoke at home! (SEE ABOVE)


Apple Wood
- Fruity sweet smoke
- Good for poultry or pork
- Can be mixed with Cherry Wood

Cherry Wood
- Sweet fruity taste
- Works well with poultry, game hens, pork, jerked meats

Hickory Chips
- The classic of smoking woods
- Strong old-fashioned flavour, but too much can overpower!
- Great on a smoker grill with most meats, but best with Beef
- Also gives a bacony flavour when you smoke cheese

Maple Wood
- Subtle sweet smoke flavour
- Good with pork

Mesquite
- Familiar Tex-Mex smoke odor and flavour
- Great with beef or chicken on a smoker grill

Oak Wood
- Balanced smokey flavour, blends well with Cherry or Apple
- Great for any type of meat

Pecan Chips
- Sweet flavour with a hint of nuttiness
- Good for asian inspired recipes


Monday, November 19, 2012

JOHN & SONS

Calling all you oyster lovers out there.

Rodney's by Bay (now known as John & Sons) is an oyster house that has been packed with businessman since day one, known for their wide variety of oysters, high quality fish dishes and of course some amazing fish & chips. Located on Temperance just at Bay St, Rodney's has been serving up some of the best oysters for years - complete with many different sauce options of your choice!


John & Sons has now just opened a new location at Yonge & Summerhill (more specifically on the corner of Balmoral in the old Terroni space). I live right near there, and the place is always packed. After a trip down to the original John & Sons this weekend, it made me very excited to try out the Summerhill location.


The "raw bar" at John & Sons will feature at least seven to nine different types of oysters each night. The rest of the menu is dedicated to sustainable fish product, boasting menu items such as a breadless tuna BLT or a Louisiana whitetail jumbo shrimp and a seafood ravioli.


So for those of you looking for a great oyster uptown in the city, I fully recommend heading over to John & Sons! Enjoy and happy oyster eating!

Wednesday, November 14, 2012

KATE & WILLS WEDDING PIE

Ever since I found Jamie's Britain - the newest in Jamie Oliver shows, I have been obsessed with making this pie. I had three friends come for dinner last week, it was a bit chilly, I had just moved into my new place and I knew this would be the perfect meal to make. Cozy & easy to make in just one pot.


The ingredient list may seem a bit daunting, but I guarantee many of these ingredients you will have in your pantry! 

The pie is just delightful, warm, rich, meaty - you can't go wrong. Perfect for a winter day. This pastry was also one of the easiest pastries I have ever made. It came together perfectly, rolled out without a crack and baked out beautifully. I highly recommend using it for a pie!

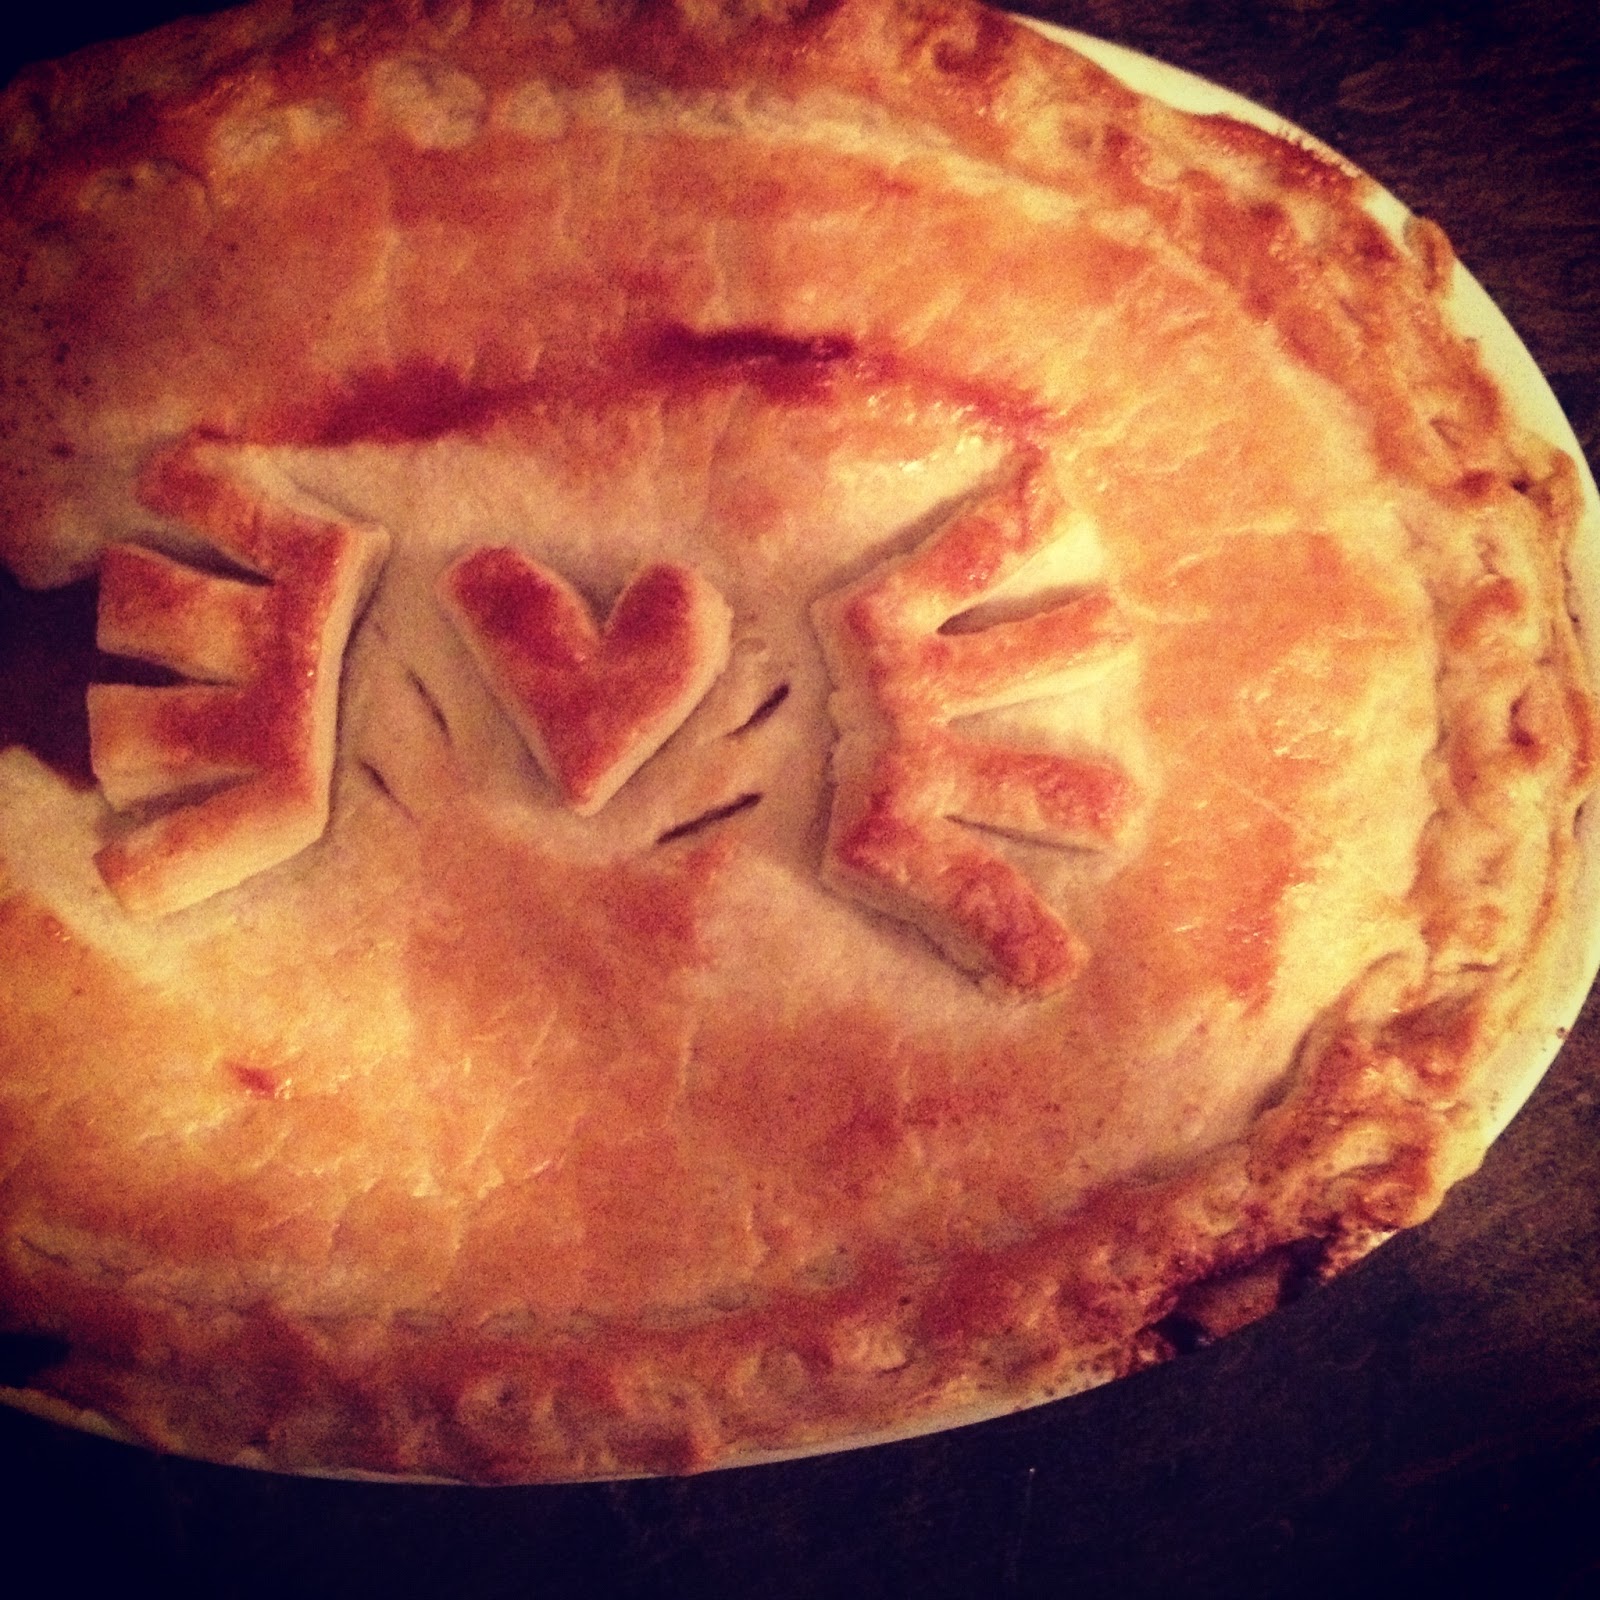
ENJOY! The decorations are as follows thanks to Jamie, RAF wings for Wills, and a heart for Kate!


Before baking

After baking

Kate & Wills Wedding Pie by Jamie Oliver
Ingredients:

Filling:
2 tbsp olive oil
1 knob of butter
3 sprigs of fresh rosemary, leaves picked and chopped
3 sprigs of fresh thyme, leaves picked
3 fresh bay leaves
3 small red onions, peeled and chopped
1 kg (2-2.5 lbs) of beef shin (I just used stew meat, because I couldn't find the shin!) (also can use the bones when stewing to have the marrow thicken and flavour the sauce)
sea salt and ground pepper
2 tbsp tomato puree
400ml good local smooth stout (I used an Oatmeal Stout from England)
2 heaping tbsp plain flour
1.5 liters (I used only about 1L) of organic beef or chicken stoic
140g pearl barley
3 tsp English Mustard (in most grocery stores in the dry section in a tube)
2-3 tbsp Worcestershire sauce
100g good white cheddar cheese

For the pastry:
300g plain flour, plus extra for dusting
100g shredded suet (or lard), easy to shred when frozen!
100g shredded butter
sea salt
1 large free range egg, beaten

Directions:
1. Put the olive oil, butter and herbs in a large casserole type pan on high heat. Add the onions and the diced meat and a couple of pinches of salt and pepper. Mix well and cook for about 10 minutes stirring occasionally.
2. Add the tomato puree, then stout. Once it has cooked for 2 minutes, add in the flour and stir until everything comes together to a simmer. Turn down the heat very low, pop the lid on and let cook for 1 hour, stirring occasionally.
3. When the hour is up, stir in the pearl barley. Put the lid back on and simmer for another hour, then remove the lid and simmer for a further 30 minutes or until the meat shreds easily and the gravy has thickened.
4. Spoon away any of the oil from the top, then stir in the mustard, Worcestershire and grated cheese. Season to taste.
5. While the stew is ticking away, put the flour, suet, butter into a bowl with a good pinch of salt. Either in a mixer or with your hands, mix together until the flour and butter mixture resembles small peas in size. Lightly stir in 125mL cold water, then for the dough into a ball. Do not overwork it. Wrap the dough and refrigerate until needed.
6. Preheat the oven to 350. Discard the shin bone and ladle the hot stew into the pie dish. Use some of the beaten egg to egg wash the edges of the pie dish, then dust a clean surface and a rolling in with flour and roll out the pastry until about 1 cm thick. Carefully place on top of the pie, then trim off the overhanging pastry. Pinch and squash the edges of the pastry to the dish. Eggwash the top and cook the pie for around 45-50 minutes.

Tuesday, November 13, 2012

HOLIDAY BOOKING

CELEBRATE THE HOLIDAYS WITH EMMA'S EATERY! BOOK NOW!


Thursday, November 8, 2012

MAGNETIC SPICE JARS

I just moved into a new place, and let me say - my cupboard space is limited! I am trying to pack all my cooking gadgets in where I can, but the things that I find tend to take up precious space are all my spices and cooking powders.


I decided I needed to find an easier way to store all these spices and found these great magnetic spice jars at Canadian Tire. They are easy to fill, and snap right on to the fridge.

For those of you in need of space - check out these great little jar for only $1.99!


Monday, November 5, 2012

DIJON BRAISED SPROUTS

Thanks to a blog I love (Smitten Kitchen), I found some great inspiration for dijon braised brussels sprouts.

On Friday night I was out for dinner, and had the must luscious and buttery braised brussels sprouts I have ever tasted. This obviously re ignited my love for the sprouts, and last night I decided to make my own version of braised brussels sprouts.

Brussels sprouts are a great winter side dish, they are often underused but a really great veg! They go as well as a side to many proteins and can be cooked in a variety of ways (blanched, fried, braised, roasted).

Smitten Kitchen Brussels Sprouts

Dijon Braised Brussels Sprouts (adapted from Smitten Kitchen)

Ingredients:
3 handfuls (or about 1 lb) brussels sprouts
1 tbsp butter
1 tbsp olive oil
salt and freshly ground black pepper
1/2 cup dry white wine
1 cup of chicken or veg broth
1 shallot, finely chopped
A splash of heavy cream
1 heaping tbsp dijon mustard
chopped parsley for garnish (optional)

Directions
1. Cut the end off the brussels sprouts and halve lengthwise.
2. In a large skillet or pan, heat the butter and oil over med high heat. Arrange the sprouts in the pan, with the cut side down in one layer. (If you have more sprouts than what will fit in your pan, do them in batches). Sear until golden brown, about 3-5 minutes
3. Add the shallots, salt and pepper.
4. Next add the wine and allow it to reduce off a bit. Then add in the stock.
5. Bring to a simmer, and reduce to medium-low heat. Cover the pan or pot with a lid (or tin foil) and allow them to braise for about 15-20 minutes or until they are fork tender.
6. Remove the sprouts from the pan, leaving the sauce behind.
7. Add the cream and simmer for a few minutes until the sauce has slightly thickened. Add in the mustard and adjust seasoning. Pour sauce over the sprouts and sprinkle with parsley if using.
8. Serve immediately and Enjoy!

Tuesday, October 30, 2012

PUMPKIN SCONES

As breakfast with my clients seems to be such a popular meal to have catered, I find myself making scones non-stop all week long ! This week I tried out two new recipes, cinnamon & walnut and a pumpkin scone, and I wanted to share the pumpkin scone recipe with you.


Pumpkin flavours just scream fall and with thanksgiving gone, who says you can't enjoy this tasty flavour for just a little bit longer. Scones are truly so easy to make and just as quick to bake. You can even roll out the dough and cut them the night before, stick them in the fridge and bake them off for your family or guests the morning of!

ENJOY!

PUMPKIN SCONES

Ingredients:
2 cups all purpose flour
1/4 cup granulated sugar
1 tbsp baking powder 
1/2 tsp salt
1 1/2 tsp pumpkin pie spices (or just a mix of nutmeg, cinnamon, cloves and ginger)
6 tbsp cold butter
1/2 cup canned pumpkin puree
3 tbsp buttermilk or cream (a little extra for brushing)
1 large egg
Coarse sugar for sprinkling at the end

Directions:
Preheat the oven to 375
In a kitchen blender, pulse together the flour, sugar, baking powder, salt, pumpkin pie spice and butter until the mixture resembles coarse cornmeal, and the butter is no bigger than a pea. 
In a bowl mix together the buttermilk, pumpkin puree and egg. Add in the flour mixture and mix until combined.
Roll out the dough to 1/2 inch thickness and cut with a circular shape into rounds, or free form triangles. Brush with more buttermilk and sprinkle with coarse sugar
Bake for 15 - 20 minutes or until golden brown and cooked throughout. 

Monday, October 22, 2012

JAMIE'S GREAT BRITAIN

If you follow my blog, you will know that I am an AVID Jamie Oliver fan!


He has been my fav since I was first introduced to him when I was 12. I think his food, philosophy & dedication towards a food movement is so impressive. His cookbooks are visually stunning, and the recipes are so true to form. Jamie is knowing for taking his culinary talents and finding the best in food around the globe, but in his newest series (Jamie's Great Britain), he takes his culinary talents across Britain in search of the food that makes their country tick.


I just discovered the show online (because you can now watch them on Food Network Canada) and I was instantly hooked. Not only is the scenery of the country beautiful, but the food created is just mouth watering. The show features Jamie learning from those around Britain about their "traditional" British food, and in turn he takes these lessons and applies them to his own cooking.

These are my favourite recipes from the show and I can't wait to try them out! They are all so rustic, warm & comforting, perfect for the upcoming months. Make sure to check out the show, I promise you lots of laughs, beautiful food and a picturesque scenery!

1. Kate & Wills Wedding Pie
http://scrapbook.channel4.com/bookmarkBar/4fab9dece4b0364202e10855


2. Rabbit Bolognese
http://scrapbook.channel4.com/bookmarkBar/4fab9d4de4b0bedfe3bdf249


3. Braised Lamb Shank with a celeriac & potato mash
http://scrapbook.channel4.com/bookmarkBar/4fab9e38e4b0c0c2de268401


Friday, October 19, 2012

SOUPSTOCK

To all those culinary friends out there...

This Sunday, hosted at Woodbine Park in the Beaches will be SOUPSTOCK!


Soupstock is a one-day culinary celebration that will feature soups from over 200 of Canada's top chefs! The food will be Canadian driven fresh and local. And not only will the chefs be in attendance but the farmers too. The idea behind Soupstock is to gain recognition and support to stop the Highland companies proposed mega quarry which will destroy farmland in Canada and destroy much of our drinkable water.


The event is supported by the Canadian Chef's Congress and the David Suzuki Foundation. Last year the event was up in the farmland area north of Toronto but right here it is in the city, and they are expecting over 40,000 people!

Come out and try some amazing soup - but don't forget to bring your own bowl and spoon!

A welcome from David Suzuki...

Thursday, October 18, 2012

BAKED BRIE

Is there anything better than baked Brie cheese? Oozing and melting all over your cracker?! Don't think so!

Baked Brie is a great appetizer and hors d'oeuvres.... A great party trick that is perfect to feed a crowd. I normally top my baked Brie with a nice smooth apricot jam but this past weekend I wanted to try something different. My creation was baked Brie topped with sun dried tomatoes, garlic, olive oil and basil. The results were great, a smooth creamy cheese balanced out by the salty tang of the cured tomatoes with a sweet note from the roared garlic. Serve with toasted up baguette or store bought crostini and you have yourself a winning dish


Baked Brie with sundried tomatoes

Ingredients:
1 wheel or Brie cheese
2 garlic cloves, minced
A Handful of sundried tomatoes roughly chopped
A handful of chopped basil
2 tbsp olive oil
Salt and pepper

Directions:
1. Preheat your oven to 400.
2. Skor your Brie cheese in a criss-cross pattern


3.  In a pan over medium heat, add the oil and garlic and let cook until fragrant. Add in the tomatoes and basil and cook for 2 minutes.
4. Place the Brie on a baking tray and place the "toppings" on top.
5. Bake for about 10 minutes or until cheese is soft and runny.
6. Serve with crostini and some pretty basil leaves for garnish

Monday, October 15, 2012

INDIAN CHICKEN CURRY

This weekend for a client's party I made a really great Indian Chicken Curry.


I basically lived on curry in university. I made them nightly, but I never really made Indian style curries - they were always Thai! I found this recipe online, and decided to give it a whirl, making a few modifications here and there. The end result was amazing, a really authentic tasting luscious chicken curry. And the best part was - it is really quick!

Indian Chicken Curry adapted from "Baked Bree"
Serves 4-6

Ingredients:
Marinade for Chicken
5 boneless skinless chicken breasts, cubed
1 cup plain yoghurt
1 tsp tikka (or garam) masala
Freshly ground black pepper
1/4 cup chopped cilantro

Curry Sauce:
1 tbsp olive or coconut oil
1 medium red onion, chopped
2 tbsp tumeric
1 tsp fennel seeds
1 tsp cumin seeds
2 tbsp curry powder
2 can diced tomatoes
1/2 cup chicken stock
2 tsp cumin
1 tsp tikka (garam) masala
1/2 tsp grated nutmeg
1/2 tsp cinnamon
1/2 cup heavy cream
salt and pepper to taste

serve with:
basmati or jasmine rice
chopped cashews
toasted coconut
chopped cilantro

Directions:
1. Mix together the marinade for the chicken, and let marinate overnight or for at least one hour.
2. In a 5L pot or larger, sweat the onions in the olive oil until translucent, about 5 minutes.
3. Add in the cumin, turmeric, fennel seeds, cumin seeds and curry powder and stir until fragrant.
4. Add in the cans of chopped tomatoes and let simmer for about 20 minutes. (At this point the recipe says to use a hand blender to blend this mixture until smooth, but to maintain the texture, I just used a hand masher to break up the large chunks, which I liked better).
5. Add the chicken to the pan and cook for about 10-12 minutes in the sauce.
6. Add in the chicken sauce, the tikka masala, nutmeg and cinnamon.
7. To finish, add in the cream and let the flavours blend together.
8. Serve over rice and top with cashews, coconut and chopped cilantro. ENJOY!

Tuesday, October 9, 2012

TURKEY & RICE SOUP

With three full turkey dinners this weekend, I think I need a break from turkey - but for those of you out there still craving the meat, I am going to share how to make a turkey stock which in turn will make you the most delicious turkey & rice soup.


This turkey and rice soup is a bit different from the classic soup with carrots and celery etc. This one uses all the fall root vegetables such as parsnip, celery root, sweet potato, butternut squash... Instead of using the typical white rice, I suggest switching it up a bit with your grains, try using barley! Barley has a sort of nuttiness to it that will compliment the root vegetables really nicely.  In this recipe, a leek is used instead of an onion. Turkey & leeks are a match made in heaven, and this recipe is really warming and delicious. Enjoy with a toasted piece of crusty fresh bread!

The first thing is to make turkey stock! Similar to that of chicken, this stock will give you a rich bold poultry flavour, and is perfect for making soups. I won't lie to you, stock does take a while, so this would be best to start in the morning, or the minute you are home from work!


To make a turkey stock:

Ingredients:
1 whole onion
3 carrots
1/2 head of celery
water
turkey carcass
peppercorns, bay leaf, thyme, parsley stems (if you don't have these don't worry!)

Directions:
1. In a 400 degree oven, roast the turkey bones, and the vegetables until browned (30-40 minutes)
2. Add the browned bones and vegetables to a stock pot and fill with water so that all the ingredients are submerged. Add in your seasonings.
3. Bring the pot to a boil.
4. Once it has started to boil, reduce to a simmer and let cook for 3-4 hours, making sure to skim off the scum from the top.
5. Once the stock is done, it is best to strain through cheesecloth. You can use immediately or freeze the stock up to 3 months. 
  
Quick Turkey & Rice Soup
Adapted from Martha Stewart's recipe, serves 4

Ingredients:
4 1/2 cups of turkey stock (or you could use chicken stock)
1 cup cooked rice (I think barley is a great substitute hear for plain old white rice)
1 1/2 cups shredded cooked turkey meat
1 medium size parsnip cut into a dice
3/4 cup of celery root diced (or turnip)
1 medium size leek, thinly sliced crosswise
knob of butter

other vegetable options to include:
1/2 cup sweet potato cubed
 1/2 cup of butternut squash cubed

Directions:
1. In a soup pot, heat up the butter, and add in the leak. Cook out until fragrant and translucent.
2. Add in the parnsip, and celery root and cook for 2-3 minutes.
3. Add in the turkey stock and cook for 5-10 minutes until the vegetables are tender.
4. Now add the turkey and rice, and let cook until the two have heated through.
5. Season with salt and pepper
6. Serve and enjoy!

Friday, October 5, 2012

CRANBERRY SAUCE

Cranberry sauce - yes or no?!?

I feel like cranberry sauce seems to be a staple at every thanksgiving meal. Do you love cranberry sauce, is it an integral part to your meal?


I must admit, that for probably 22 years, I never even tried cranberry sauce. My grandma would make it every year, and I would devour the rest of her scrumptious meal, but never would I go near the sauce!

Two years ago, when I made my own full thanksgiving dinner at my new apartment for my family, I knew I had to make the cranberry sauce. With no real recipe to go off of, I sort of just experimented with flavour and spices I liked to see if I could come up with a great product....and I did! I now adore cranberry sauce and think it is necessary to go side by side that beautiful bird.


Emma's Eatery Cranberry Sauce

Ingredients:
1 package cranberries (frozen or fresh)
Granulated sugar, equal weight to that of the cranberries
Splash of water
Juice & zest of 1 lemon
Juice & zest of 1 small orange
1/4 tsp all spice
1/2 tsp cinnamon
1/2 tsp salt

Directions:
1. Place all of the ingredients in a pot, bring to a boil. Once boiling, reduce heat to a simmer and let cook for about 30 minutes, until you have a jammy sauce like consistency.
2. Check seasoning, and thin out with a little water if need be.


Thursday, October 4, 2012

PUMPKIN BREAD

Last year, for thanksgiving, for the first time I made a pumpkin loaf. My little sibs fell in love with it and has now become a staple request for thanksgiving. Today I cooked my first of the three thanksgiving dinners and of course pumpkin loaf was on the menu.


I wanted to share this great, easy, festive and thanksgiving spice filled recipe!

Enjoy & HAPPY THANKSGIVING!

Pumpkin Loaf via Good Food Revolution
9 by 5 inch loaf pan

Ingredients:
1 1/2 cups all purpose flour
2/3 cup granulated sugar
1 tsp baking powder
1 tsp baking soda
1 tsp ground cinnamon
1/2 tsp ground nutmeg
1/2 tsp ground cloves
1/4 tsp salt
2 large eggs
1 cup canned pumpkin puree
1/3 cup vegetable oil
2 tbsp green pumpkin seeds

Directions:
1. In a bowl, combine flour, sugar, baking powder, baking soda, cinnamon, nutmeg, cloves and salt. Set aside
2. In a large bowl with a wooden spoon or electric mixer, beat together eggs, pumpkin and oil. Gradually add flour mixture, until blended. Spread batter evenly into the loaf pan. Sprinkle pumpkin seeds over the top.
3. Bake at 350 for around 55-60 minutes, or until a toothpick inserted in the center comes out clean